(Page créée avec « en:MH4U:_Guild_Quests {{ATraduire}} {{MH4UMenuV2}} ==Quêtes Guilde== If you fulfill certain conditions during an Expedition, such as slay the ... ») Balise : sourceedit |
Aucun résumé des modifications Balise : sourceedit |
||
| Ligne 1 : | Ligne 1 : | ||
| − | [[en:MH4U: |
+ | [[en:MH4U:_Expeditions]] |
{{ATraduire}} |
{{ATraduire}} |
||
{{MH4UMenuV2}} |
{{MH4UMenuV2}} |
||
| − | == |
+ | ==Expeditions== |
| + | In this single player mode, hunters explore the [[Everwood]] without prior knowledge of the map layout or the kinds of monsters that will appear. |
||
| − | If you fulfill certain conditions during an [[MH4U: Expeditions|Expedition]], such as slay the specified large monster, the Guild will give you clearance to take on special Quests. These are called Guild Quests, and they can be registered via the menu and then selected from the Gathering Hall's Quest Counter. |
||
| + | *There are no fail conditions. You will return to base camp no matter how many times you faint. |
||
| + | *If you reach the wagon waiting at the end of the Everwood, you'll receive special benefits and perks. You can also end an Expedition from the menu at any time. |
||
| + | *Hunting monsters you discover during an Expedition will net you Caravan Points, which can be used at certain facilities. |
||
{{-}} |
{{-}} |
||
| − | === |
+ | ===Going On an Expedition=== |
| − | [[File:MH4U- |
+ | [[File:MH4U-Expeditions Screenshot 001.jpg|thumb|250px]] |
| − | + | After you gain access to the Everwood, you can go on an Expedition at any time from the World Map. |
|
| + | |||
| + | By completing Quests undertaken at towns and at the Gathering Hall, you'll unlock the ability to go on High-rank and G-rank Expeditions. |
||
{{-}} |
{{-}} |
||
| + | ===Relics=== |
||
| − | ===Registering Guild Quests=== |
||
| + | [[File:MH4U-Expeditions Screenshot 002.jpg|325px]] [[File:MH4U-Expeditions Screenshot 003.jpg|325px]]<br /> |
||
| − | [[File:MH4U-Guild Quests_Screenshot_002.jpg|thumb|250px]] |
||
| + | You may discover weapons and armor in the Everwood known as "Relics", but you won't be able to use them as they are. You'll have to take them to a [[Harth|certain town]] to polish them up before they can be used. |
||
| − | Guild Quests must be registered before they can be undertaken. Select a Guild Quest from the Quest Pool and then register it. You can have up to 10 registered Quests at once. |
||
| + | |||
| + | *For a list of Relic Weapons, see the [[MH4U: Relic Weapons]] page. |
||
| + | *For a list of Relic Armors, see the [[MH4U: Relic Armor]] page. |
||
{{-}} |
{{-}} |
||
| − | === |
+ | ===Viewing Expedition Info=== |
| − | [[File:MH4U- |
+ | [[File:MH4U-Expeditions Screenshot 004.jpg|thumb|250px]] |
| + | Expedition info is available for viewing from the World Map before you depart on an Expedition. Check back often as the monsters and Relics that appear in the Everwood change each time you return from a Quest. |
||
| − | Once a Guild Quest has been registered, you can undertake it via the Gathering Hall's Quest Counter. |
||
| + | |||
| + | *Monsters |
||
| + | **Monsters known to appear in the area. |
||
| + | *Environment |
||
| + | **If the environment is listed as "Unstable", there is a possibility of monsters not listed in the Expedition info appearing. |
||
| + | *Treasure Area |
||
| + | **Indicates whether or not there are areas where rare items can be acquired. |
||
| + | *Wild Palicoes |
||
| + | **Indicates whether or not there are Wild Palicoes waiting to be recruited. (Wild Palicoes will begin to appear once you've made a certain level of progress through the single player mode.) |
||
| + | *Poogie |
||
| + | **Indicates whether or not there are poogies out for a stroll. Poogies found in the Everwood may be wearing unusual costumes. |
||
| + | *Equipment Bias |
||
| + | **Indicates the type of equipment likely to be obtained from Relics. |
||
{{-}} |
{{-}} |
||
| − | === |
+ | ===Rare Ecospheres=== |
| − | [[File:MH4U- |
+ | [[File:MH4U-Expeditions Screenshot 005.jpg|thumb|250px]] |
| + | Occasionally, Rare Ecospheres appear where special monsters can be hunted and valuable items are easily found. The chances of Rare Ecospheres appearing will increase as you go on Expeditions and increase your Rare Eco Discovery Rate. |
||
| − | Clearing a Guild Quest will raise its level and difficulty. |
||
{{-}} |
{{-}} |
||
| + | ==Monster Unlocks== |
||
| − | ===Sending Guild Quests=== |
||
| + | {| class="hover linetable" width="100%" align="center" style="text-align:center; background-color:#EBEBEB; color:#371c01; font-size:10pt;" |
||
| − | [[File:MH4U-Guild Quests_Screenshot_005.jpg|thumb|250px]] |
||
| + | |width="80px" style="background-color:#3a5766; color:#FFFFFF;"|'''Monster Unlocked''' |
||
| − | You can go on Guild Quests with other players, and you can distribute them to other players as well. |
||
| + | |width="300px" style="background-color:#3a5766; color:#FFFFFF;"|'''Quest Required''' |
||
| + | |width="70px" style="background-color:#3a5766; color:#FFFFFF;"|'''Expedition Rank''' |
||
| + | |- |
||
| + | |[[Kecha Wacha]] |
||
| + | |Complete 3★ Caravan Quest "Swing Into Action" |
||
| + | |Low Rank |
||
| + | |- |
||
| + | |[[Tetsucabra]] |
||
| + | |Complete 3★ Caravan Quest "Boulder-bash" |
||
| + | |Low Rank |
||
| + | |- |
||
| + | |[[Gypceros]] |
||
| + | |Complete 3★ Caravan Quest "Shipshape Skin" |
||
| + | |Low Rank |
||
| + | |- |
||
| + | |[[Basarios]] |
||
| + | |Complete 3★ Caravan Quest "Research: Basarios" |
||
| + | |Low Rank |
||
| + | |- |
||
| + | |[[Nerscylla]] |
||
| + | |Complete 4★ Caravan Quest "Nerscylla Thrilla" |
||
| + | |Low Rank |
||
| + | |- |
||
| + | |[[Congalala]] |
||
| + | |Complete 4★ Caravan Quest "Wild Palico Panic" |
||
| + | |Low Rank |
||
| + | |- |
||
| + | |[[Najarala]] |
||
| + | |Complete 4★ Caravan Quest "Najarala Hunt" |
||
| + | |Low Rank |
||
| + | |- |
||
| + | |[[Khezu]] |
||
| + | |Complete 4★ Caravan Quest "The Walls Have Eyes" |
||
| + | |Low Rank |
||
| + | |- |
||
| + | |[[Rathian]] |
||
| + | |Complete 4★ Caravan Quest "Troverian Trouble" |
||
| + | |Low Rank |
||
| + | |- |
||
| + | |[[Gore Magala]] |
||
| + | |Complete 5★ Caravan Quest "Tipping the Scales" |
||
| + | |Low Rank |
||
| + | |- |
||
| + | |[[Iodrome]] |
||
| + | |Complete 5★ Caravan Quest "Pick Your Poison" |
||
| + | |Low Rank |
||
| + | |- |
||
| + | |[[Gravios]] |
||
| + | |Complete 5★ Caravan Quest "Major Miner Problem" |
||
| + | |Low Rank |
||
| + | |- |
||
| + | |[[Seltas Queen]] |
||
| + | |Complete 5★ Caravan Quest "The Royal Guard" |
||
| + | |Low Rank |
||
| + | |- |
||
| + | |[[Rathalos]] |
||
| + | |Complete 5★ Caravan Quest "King of the Skies" |
||
| + | |Low Rank |
||
| + | |- |
||
| + | |[[Yian Garuga]] |
||
| + | |Complete 5★ Caravan Quest "Research: Yian Garuga" |
||
| + | |Low Rank |
||
| + | |- |
||
| + | |[[Seltas]] |
||
| + | |Complete 4★ Gathering Hall Quest "Seltas Romance" |
||
| + | |High Rank |
||
| + | |- |
||
| + | |[[Kecha Wacha]] |
||
| + | |Complete 4★ Gathering Hall Quest "Operation Catch-a-Kecha" |
||
| + | |High Rank |
||
| + | |- |
||
| + | |[[Gypceros]] |
||
| + | |Complete 4★ Gathering Hall Quest "Gypceros Overload" |
||
| + | |High Rank |
||
| + | |- |
||
| + | |[[Emerald Congalala]] |
||
| + | |Complete 4★ Gathering Hall Quest "Buffoonish Baboon" |
||
| + | |High Rank |
||
| + | |- |
||
| + | |[[Congalala]] |
||
| + | |Complete 4★ Gathering Hall Quest "Pink Stink" |
||
| + | |High Rank |
||
| + | |- |
||
| + | |[[Nerscylla]] |
||
| + | |Complete 5★ Gathering Hall Quest "Rathian's Wrath" |
||
| + | |High Rank |
||
| + | |- |
||
| + | |[[Blue Yian Kut-Ku]] |
||
| + | |Complete 5★ Gathering Hall Quest "Rathian's Wrath" |
||
| + | |High Rank |
||
| + | |- |
||
| + | |[[Tetsucabra]] |
||
| + | |Complete 5★ Gathering Hall Quest "Rathian's Wrath" |
||
| + | |High Rank |
||
| + | |- |
||
| + | |[[Purple Gypceros]] |
||
| + | |Complete 5★ Gathering Hall Quest "Rathian's Wrath" |
||
| + | |High Rank |
||
| + | |- |
||
| + | |[[Yian Kut-Ku]] |
||
| + | |Complete 5★ Gathering Hall Quest "Rathian's Wrath" |
||
| + | |High Rank |
||
| + | |- |
||
| + | |[[Khezu]] |
||
| + | |Complete 5★ Gathering Hall Quest "Electrifying Encounter" |
||
| + | |High Rank |
||
| + | |- |
||
| + | |[[Rathalos]] |
||
| + | |Complete 5★ Gathering Hall Quest "Advanced: Eerie Aerie" |
||
| + | |High Rank |
||
| + | |- |
||
| + | |[[Ruby Basarios]] |
||
| + | |Complete 6★ Gathering Hall Quest "Ore D'oeuvre" |
||
| + | |High Rank |
||
| + | |- |
||
| + | |[[Najarala]] |
||
| + | |Complete 6★ Gathering Hall Quest "Ore D'oeuvre" |
||
| + | |High Rank |
||
| + | |- |
||
| + | |[[Pink Rathian]] |
||
| + | |Complete 6★ Gathering Hall Quest "Ore D'oeuvre" |
||
| + | |High Rank |
||
| + | |- |
||
| + | |[[Red Khezu]] |
||
| + | |Complete 6★ Gathering Hall Quest "Ore D'oeuvre" |
||
| + | |High Rank |
||
| + | |- |
||
| + | |[[Basarios]] |
||
| + | |Complete 6★ Gathering Hall Quest "Ore D'oeuvre" |
||
| + | |High Rank |
||
| + | |- |
||
| + | |[[Rathian]] |
||
| + | |Complete 6★ Gathering Hall Quest "Advanced: Heaven and Earth" |
||
| + | |High Rank |
||
| + | |- |
||
| + | |[[Tigrex]] |
||
| + | |Complete 6★ Gathering Hall Quest "Advanced: Forest Gone Wild" |
||
| + | |High Rank |
||
| + | |- |
||
| + | |[[Gravios]] |
||
| + | |Complete 7★ Gathering Hall Quest "Advanced: Stop the Wheel" |
||
| + | |High Rank |
||
| + | |- |
||
| + | |[[Gore Magala]] |
||
| + | |Complete 7★ Gathering Hall Quest "Advanced: Stop the Wheel" |
||
| + | |High Rank |
||
| + | |- |
||
| + | |[[Yian Garuga]] |
||
| + | |Complete 7★ Gathering Hall Quest "Advanced: Stop the Wheel" |
||
| + | |High Rank |
||
| + | |- |
||
| + | |[[Seltas Queen]] |
||
| + | |Complete 7★ Gathering Hall Quest "Advanced: Stop the Wheel" |
||
| + | |High Rank |
||
| + | |- |
||
| + | |[[Black Gravios]] |
||
| + | |Complete 7★ Gathering Hall Quest "Advanced: Stop the Wheel" |
||
| + | |High Rank |
||
| + | |- |
||
| + | |[[Azure Rathalos]] |
||
| + | |Complete 7★ Gathering Hall Quest "Ring of the Silver Sol" |
||
| + | |High Rank |
||
| + | |- |
||
| + | |[[Khezu]] |
||
| + | |Complete 10★ Caravan Quest "Icy Shadow" |
||
| + | |G Rank |
||
| + | |- |
||
| + | |[[Shrouded Nerscylla]] |
||
| + | |Complete 10★ Caravan Quest "Shrouded in Mystery" |
||
| + | |G Rank |
||
| + | |- |
||
| + | |[[Monoblos]] |
||
| + | |Complete 10★ Caravan Quest "Bad Hair Day: Monoblos" |
||
| + | |G Rank |
||
| + | |- |
||
| + | |[[White Monoblos]] |
||
| + | |Complete 10★ Caravan Quest "The Silvery Spear" |
||
| + | |G Rank |
||
| + | |- |
||
| + | |[[Kecha Wacha]] |
||
| + | |Complete G1★ Gathering Hall Quest "Lumber Support" |
||
| + | |G Rank |
||
| + | |- |
||
| + | |[[Tetsucabra]] |
||
| + | |Complete G1★ Gathering Hall Quest "Chasing Tail" |
||
| + | |G Rank |
||
| + | |- |
||
| + | |[[Purple Gypceros]] |
||
| + | |Complete G1★ Gathering Hall Quest "Purple Pros" |
||
| + | |G Rank |
||
| + | |- |
||
| + | |[[Congalala]] |
||
| + | |Complete G1★ Gathering Hall Quest "Hunger Games" |
||
| + | |G Rank |
||
| + | |- |
||
| + | |[[Emerald Congalala]] |
||
| + | |Complete G1★ Gathering Hall Quest "Primate Plunder" |
||
| + | |G Rank |
||
| + | |- |
||
| + | |[[Nerscylla]] |
||
| + | |Complete G1★ Gathering Hall Quest "Death and Taxidermy" |
||
| + | |G Rank |
||
| + | |- |
||
| + | |[[Najarala]] |
||
| + | |Complete G1★ Gathering Hall Quest "Serpentine Samba" |
||
| + | |G Rank |
||
| + | |- |
||
| + | |[[Pink Rathian]] |
||
| + | |Complete G1★ Gathering Hall Quest "Pink Problems" |
||
| + | |G Rank |
||
| + | |- |
||
| + | |[[Red Khezu]] |
||
| + | |Complete G1★ Gathering Hall Quest "La Vie en Rose" |
||
| + | |G Rank |
||
| + | |- |
||
| + | |[[Khezu]] |
||
| + | |Complete G1★ Gathering Hall Quest "Hunt-a-thon: Khezu" |
||
| + | |G Rank |
||
| + | |- |
||
| + | |[[Shrouded Nerscylla]] |
||
| + | |Complete G2★ Gathering Hall Quest "Course Correction" |
||
| + | |G Rank |
||
| + | |- |
||
| + | |[[Rathalos]] |
||
| + | |Complete G2★ Gathering Hall Quest "Sovereign of the Sky" |
||
| + | |G Rank |
||
| + | |- |
||
| + | |[[Azure Rathalos]] |
||
| + | |Complete G2★ Gathering Hall Quest "The Azure King and the Tyrant" |
||
| + | |G Rank |
||
| + | |- |
||
| + | |[[Tigrex]] |
||
| + | |Complete G2★ Gathering Hall Quest "The Azure King and the Tyrant" |
||
| + | |G Rank |
||
| + | |- |
||
| + | |[[Seltas Queen]] |
||
| + | |Complete G2★ Gathering Hall Quest "Strutting the Royal Runway" |
||
| + | |G Rank |
||
| + | |- |
||
| + | |[[Desert Seltas Queen]] |
||
| + | |Complete G2★ Gathering Hall Quest "Pestering Pest" |
||
| + | |G Rank |
||
| + | |- |
||
| + | |[[Gravios]] |
||
| + | |Complete G2★ Gathering Hall Quest "Temper Tantrum" |
||
| + | |G Rank |
||
| + | |- |
||
| + | |[[Black Gravios]] |
||
| + | |Complete G2★ Gathering Hall Quest "Hollow Promise" |
||
| + | |G Rank |
||
| + | |- |
||
| + | |[[Diablos]] |
||
| + | |Complete G2★ Gathering Hall Quest "Showdown at High Noon" |
||
| + | |G Rank |
||
| + | |- |
||
| + | |[[Black Diablos]] |
||
| + | |Complete G2★ Gathering Hall Quest "Showdown at Midnight" |
||
| + | |G Rank |
||
| + | |- |
||
| + | |} |
||
| + | {{-}} |
||
| − | *You can receive or send Guild Quests via the Courier or from the Guild Quests menu option while playing Multiplayer. |
||
| + | ==G Rank Guild Quests Gained== |
||
| − | *No matter what level a Guild Quest is currently at, it will always be distributed at a pre-determined level. |
||
| + | {| class="linetable" width="80%" align="center" style="text-align:center; background-color:#EBEBEB; color:#371c01;" |
||
| + | |width="150px" style="background-color:#3a5766; color:#FFFFFF;"|'''Monster Hunted''' |
||
| + | |width="200px" style="background-color:#3a5766; color:#FFFFFF;"|'''Monster Received''' |
||
| + | |width="60px" style="background-color:#3a5766; color:#FFFFFF;"|'''Probability*''' |
||
| + | |width="60px" style="background-color:#3a5766; color:#FFFFFF;"|'''Initial Level*''' |
||
| + | |- |
||
| + | |rowspan="3" style="border-bottom: 2px solid #000000;"|[[Seltas]] |
||
| + | |[[Velocidrome]] |
||
| + | |50% |
||
| + | |86 |
||
| + | |- |
||
| + | |[[Yian Kut-Ku]] |
||
| + | |30% |
||
| + | |86 |
||
| + | |- |
||
| + | |style="border-bottom: 2px solid #000000;"|[[Rajang]] |
||
| + | |style="border-bottom: 2px solid #000000;"|20% |
||
| + | |style="border-bottom: 2px solid #000000;"|116 |
||
| + | |- |
||
| + | |rowspan="3" style="border-bottom: 2px solid #000000;"|[[Desert Seltas]] |
||
| + | |[[Velocidrome]] |
||
| + | |50% |
||
| + | |86 |
||
| + | |- |
||
| + | |[[Yian Kut-Ku]] |
||
| + | |30% |
||
| + | |86 |
||
| + | |- |
||
| + | |style="border-bottom: 2px solid #000000;"|[[Chameleos]] |
||
| + | |style="border-bottom: 2px solid #000000;"|20% |
||
| + | |style="border-bottom: 2px solid #000000;"|116 |
||
| + | |- |
||
| + | |rowspan="4" style="border-bottom: 2px solid #000000;"|[[Deviljho]]<br />(Unstable Only) |
||
| + | |[[Deviljho]] |
||
| + | |30% |
||
| + | |120 |
||
| + | |- |
||
| + | |[[Ruby Basarios]] |
||
| + | |30% |
||
| + | |94 |
||
| + | |- |
||
| + | |[[Kirin]] |
||
| + | |20% |
||
| + | |120 |
||
| + | |- |
||
| + | |style="border-bottom: 2px solid #000000;"|[[Oroshi Kirin]] |
||
| + | |style="border-bottom: 2px solid #000000;"|20% |
||
| + | |style="border-bottom: 2px solid #000000;"|120 |
||
| + | |- |
||
| + | |rowspan="4" style="border-bottom: 2px solid #000000;"|[[Savage Deviljho]]<br />(Rare Only) |
||
| + | |[[Deviljho]] |
||
| + | |40% |
||
| + | |120 |
||
| + | |- |
||
| + | |[[Yian Garuga]] |
||
| + | |20% |
||
| + | |94 |
||
| + | |- |
||
| + | |[[Oroshi Kirin]] |
||
| + | |20% |
||
| + | |120 |
||
| + | |- |
||
| + | |style="border-bottom: 2px solid #000000;"|[[Rajang]] |
||
| + | |style="border-bottom: 2px solid #000000;"|20% |
||
| + | |style="border-bottom: 2px solid #000000;"|120 |
||
| + | |- |
||
| + | |rowspan="4" style="border-bottom: 2px solid #000000;"|[[Yian Garuga]]<br />(Rare Only) |
||
| + | |[[Yian Garuga]] |
||
| + | |40% |
||
| + | |94 |
||
| + | |- |
||
| + | |[[Seregios]] |
||
| + | |20% |
||
| + | |94 |
||
| + | |- |
||
| + | |[[Black Diablos]] |
||
| + | |20% |
||
| + | |94 |
||
| + | |- |
||
| + | |style="border-bottom: 2px solid #000000;"|[[Oroshi Kirin]] |
||
| + | |style="border-bottom: 2px solid #000000;"|20% |
||
| + | |style="border-bottom: 2px solid #000000;"|118 |
||
| + | |- |
||
| + | |rowspan="4" style="border-bottom: 2px solid #000000;"|[[Yian Kut-Ku]] |
||
| + | |[[Yian Kut-Ku]] |
||
| + | |40% |
||
| + | |90 |
||
| + | |- |
||
| + | |[[Basarios]] |
||
| + | |30% |
||
| + | |86 |
||
| + | |- |
||
| + | |[[Blue Yian Kut-Ku]] |
||
| + | |20% |
||
| + | |90 |
||
| + | |- |
||
| + | |style="border-bottom: 2px solid #000000;"|[[Rajang]] |
||
| + | |style="border-bottom: 2px solid #000000;"|10% |
||
| + | |style="border-bottom: 2px solid #000000;"|116 |
||
| + | |- |
||
| + | |rowspan="4" style="border-bottom: 2px solid #000000;"|[[Blue Yian Kut-Ku]]<br />(Rare Only) |
||
| + | |[[Blue Yian Kut-Ku]] |
||
| + | |50% |
||
| + | |90 |
||
| + | |- |
||
| + | |[[Yian Kut-Ku]] |
||
| + | |20% |
||
| + | |90 |
||
| + | |- |
||
| + | |[[Plum Daimyo Hermitaur]] |
||
| + | |20% |
||
| + | |90 |
||
| + | |- |
||
| + | |style="border-bottom: 2px solid #000000;"|[[Chameleos]] |
||
| + | |style="border-bottom: 2px solid #000000;"|10% |
||
| + | |style="border-bottom: 2px solid #000000;"|116 |
||
| + | |- |
||
| + | |rowspan="5" style="border-bottom: 2px solid #000000;"|[[Najarala]] |
||
| + | |[[Yian Garuga]] |
||
| + | |30% |
||
| + | |94 |
||
| + | |- |
||
| + | |[[Gore Magala]] |
||
| + | |20% |
||
| + | |94 |
||
| + | |- |
||
| + | |[[Tigrex]] |
||
| + | |20% |
||
| + | |94 |
||
| + | |- |
||
| + | |[[Kirin]] |
||
| + | |15% |
||
| + | |116 |
||
| + | |- |
||
| + | |style="border-bottom: 2px solid #000000;"|[[Brachydios]] |
||
| + | |style="border-bottom: 2px solid #000000;"|15% |
||
| + | |style="border-bottom: 2px solid #000000;"|94 |
||
| + | |- |
||
| + | |rowspan="5" style="border-bottom: 2px solid #000000;"|[[Tidal Najarala]]<br />(Rare Only) |
||
| + | |[[Yian Garuga]] |
||
| + | |30% |
||
| + | |98 |
||
| + | |- |
||
| + | |[[Stygian Zinogre]] |
||
| + | |30% |
||
| + | |94 |
||
| + | |- |
||
| + | |[[Brute Tigrex]] |
||
| + | |25% |
||
| + | |94 |
||
| + | |- |
||
| + | |[[Oroshi Kirin]] |
||
| + | |25% |
||
| + | |116 |
||
| + | |- |
||
| + | |style="border-bottom: 2px solid #000000;"|[[Brachydios]] |
||
| + | |style="border-bottom: 2px solid #000000;"|25% |
||
| + | |style="border-bottom: 2px solid #000000;"|90 |
||
| + | |- |
||
| + | |rowspan="4" style="border-bottom: 2px solid #000000;"|[[Gravios]] |
||
| + | |[[Yian Garuga]] |
||
| + | |40% |
||
| + | |98 |
||
| + | |- |
||
| + | |[[Gore Magala]] |
||
| + | |30% |
||
| + | |94 |
||
| + | |- |
||
| + | |[[Teostra]] |
||
| + | |15% |
||
| + | |94 |
||
| + | |- |
||
| + | |style="border-bottom: 2px solid #000000;"|[[Rajang]] |
||
| + | |style="border-bottom: 2px solid #000000;"|15% |
||
| + | |style="border-bottom: 2px solid #000000;"|116 |
||
| + | |- |
||
| + | |rowspan="4" style="border-bottom: 2px solid #000000;"|[[Black Gravios]] |
||
| + | |[[Black Diablos]] |
||
| + | |40% |
||
| + | |101 |
||
| + | |- |
||
| + | |[[Shagaru Magala]] |
||
| + | |30% |
||
| + | |120 |
||
| + | |- |
||
| + | |[[Kushala Daora]] |
||
| + | |15% |
||
| + | |120 |
||
| + | |- |
||
| + | |style="border-bottom: 2px solid #000000;"|[[Rajang]] |
||
| + | |style="border-bottom: 2px solid #000000;"|15% |
||
| + | |style="border-bottom: 2px solid #000000;"|120 |
||
| + | |- |
||
| + | |rowspan="4" style="border-bottom: 2px solid #000000;"|[[Kecha Wacha]] |
||
| + | |[[Velocidrome]] |
||
| + | |40% |
||
| + | |90 |
||
| + | |- |
||
| + | |[[Yian Kut-Ku]] |
||
| + | |30% |
||
| + | |90 |
||
| + | |- |
||
| + | |[[Rajang]] |
||
| + | |20% |
||
| + | |116 |
||
| + | |- |
||
| + | |style="border-bottom: 2px solid #000000;"|[[Basarios]] |
||
| + | |style="border-bottom: 2px solid #000000;"|10% |
||
| + | |style="border-bottom: 2px solid #000000;"|86 |
||
| + | |- |
||
| + | |rowspan="3" style="border-bottom: 2px solid #000000;"|[[Ash Kecha Wacha]]<br />(Rare Only) |
||
| + | |[[Ruby Basarios]] |
||
| + | |50% |
||
| + | |86 |
||
| + | |- |
||
| + | |[[Blue Yian Kut-Ku]] |
||
| + | |35% |
||
| + | |86 |
||
| + | |- |
||
| + | |style="border-bottom: 2px solid #000000;"|[[Chameleos]] |
||
| + | |style="border-bottom: 2px solid #000000;"|15% |
||
| + | |style="border-bottom: 2px solid #000000;"|120 |
||
| + | |- |
||
| + | |rowspan="4" style="border-bottom: 2px solid #000000;"|[[Seltas Queen]] |
||
| + | |[[Brachydios]] |
||
| + | |35% |
||
| + | |101 |
||
| + | |- |
||
| + | |[[Gore Magala]] |
||
| + | |25% |
||
| + | |98 |
||
| + | |- |
||
| + | |[[Shagaru Magala]] |
||
| + | |25% |
||
| + | |116 |
||
| + | |- |
||
| + | |style="border-bottom: 2px solid #000000;"|[[Kushala Daora]] |
||
| + | |style="border-bottom: 2px solid #000000;"|15% |
||
| + | |style="border-bottom: 2px solid #000000;"|118 |
||
| + | |- |
||
| + | |rowspan="4" style="border-bottom: 2px solid #000000;"|[[Desert Seltas Queen]] |
||
| + | |[[Brachydios]] |
||
| + | |35% |
||
| + | |101 |
||
| + | |- |
||
| + | |[[Gore Magala]] |
||
| + | |25% |
||
| + | |98 |
||
| + | |- |
||
| + | |[[Shagaru Magala]] |
||
| + | |25% |
||
| + | |120 |
||
| + | |- |
||
| + | |style="border-bottom: 2px solid #000000;"|[[Teostra]] |
||
| + | |style="border-bottom: 2px solid #000000;"|15% |
||
| + | |style="border-bottom: 2px solid #000000;"|120 |
||
| + | |- |
||
| + | |rowspan="3" style="border-bottom: 2px solid #000000;"|[[Gypceros]]<br />(Unstable Only) |
||
| + | |[[Blue Yian Kut-Ku]] |
||
| + | |50% |
||
| + | |86 |
||
| + | |- |
||
| + | |[[Velocidrome]] |
||
| + | |35% |
||
| + | |86 |
||
| + | |- |
||
| + | |style="border-bottom: 2px solid #000000;"|[[Kirin]] |
||
| + | |style="border-bottom: 2px solid #000000;"|15% |
||
| + | |style="border-bottom: 2px solid #000000;"|116 |
||
| + | |- |
||
| + | |rowspan="3" style="border-bottom: 2px solid #000000;"|[[Purple Gypceros]]<br />(Unstable Only) |
||
| + | |[[Blue Yian Kut-Ku]] |
||
| + | |40% |
||
| + | |86 |
||
| + | |- |
||
| + | |[[Velocidrome]] |
||
| + | |35% |
||
| + | |86 |
||
| + | |- |
||
| + | |style="border-bottom: 2px solid #000000;"|[[Kirin]] |
||
| + | |style="border-bottom: 2px solid #000000;"|25% |
||
| + | |style="border-bottom: 2px solid #000000;"|116 |
||
| + | |- |
||
| + | |rowspan="3" style="border-bottom: 2px solid #000000;"|[[Gore Magala]]<br />(Rare Only) |
||
| + | |[[Gore Magala]] |
||
| + | |40% |
||
| + | |98 |
||
| + | |- |
||
| + | |[[Shagaru Magala]] |
||
| + | |30% |
||
| + | |116 |
||
| + | |- |
||
| + | |style="border-bottom: 2px solid #000000;"|[[Teostra]] |
||
| + | |style="border-bottom: 2px solid #000000;"|30% |
||
| + | |style="border-bottom: 2px solid #000000;"|118 |
||
| + | |- |
||
| + | |rowspan="4" style="border-bottom: 2px solid #000000;"|[[Seregios]]<br />(Rare Only) |
||
| + | |[[Seregios]] |
||
| + | |40% |
||
| + | |94 |
||
| + | |- |
||
| + | |[[Yian Garuga]] |
||
| + | |25% |
||
| + | |98 |
||
| + | |- |
||
| + | |[[Gore Magala]] |
||
| + | |20% |
||
| + | |98 |
||
| + | |- |
||
| + | |style="border-bottom: 2px solid #000000;"|[[Oroshi Kirin]] |
||
| + | |style="border-bottom: 2px solid #000000;"|15% |
||
| + | |style="border-bottom: 2px solid #000000;"|118 |
||
| + | |- |
||
| + | |rowspan="4" style="border-bottom: 2px solid #000000;"|[[Daimyo Hermitaur]] |
||
| + | |[[Plum Daimyo Hermitaur]] |
||
| + | |40% |
||
| + | |86 |
||
| + | |- |
||
| + | |[[Yian Kut-Ku]] |
||
| + | |20% |
||
| + | |90 |
||
| + | |- |
||
| + | |[[Basarios]] |
||
| + | |20% |
||
| + | |86 |
||
| + | |- |
||
| + | |style="border-bottom: 2px solid #000000;"|[[Rajang]] |
||
| + | |style="border-bottom: 2px solid #000000;"|20% |
||
| + | |style="border-bottom: 2px solid #000000;"|116 |
||
| + | |- |
||
| + | |rowspan="4" style="border-bottom: 2px solid #000000;"|[[Plum Daimyo Hermitaur]]<br />(Unstable Only) |
||
| + | |[[Plum Daimyo Hermitaur]] |
||
| + | |40% |
||
| + | |86 |
||
| + | |- |
||
| + | |[[Blue Yian Kut-Ku]] |
||
| + | |20% |
||
| + | |90 |
||
| + | |- |
||
| + | |[[Chameleos]] |
||
| + | |20% |
||
| + | |120 |
||
| + | |- |
||
| + | |style="border-bottom: 2px solid #000000;"|[[Basarios]] |
||
| + | |style="border-bottom: 2px solid #000000;"|20% |
||
| + | |style="border-bottom: 2px solid #000000;"|90 |
||
| + | |- |
||
| + | |rowspan="4" style="border-bottom: 2px solid #000000;"|[[Diablos]] |
||
| + | |[[Diablos]] |
||
| + | |40% |
||
| + | |101 |
||
| + | |- |
||
| + | |[[Black Diablos]] |
||
| + | |25% |
||
| + | |101 |
||
| + | |- |
||
| + | |[[Kirin]] |
||
| + | |20% |
||
| + | |118 |
||
| + | |- |
||
| + | |style="border-bottom: 2px solid #000000;"|[[Kushala Daora]] |
||
| + | |style="border-bottom: 2px solid #000000;"|15% |
||
| + | |style="border-bottom: 2px solid #000000;"|120 |
||
| + | |- |
||
| + | |rowspan="4" style="border-bottom: 2px solid #000000;"|[[Black Diablos]] |
||
| + | |[[Black Diablos]] |
||
| + | |40% |
||
| + | |101 |
||
| + | |- |
||
| + | |[[Yian Garuga]] |
||
| + | |20% |
||
| + | |101 |
||
| + | |- |
||
| + | |[[Diablos]] |
||
| + | |20% |
||
| + | |101 |
||
| + | |- |
||
| + | |style="border-bottom: 2px solid #000000;"|[[Teostra]] |
||
| + | |style="border-bottom: 2px solid #000000;"|20% |
||
| + | |style="border-bottom: 2px solid #000000;"|120 |
||
| + | |- |
||
| + | |rowspan="5" style="border-bottom: 2px solid #000000;"|[[Tigrex]]<br />(Unstable Only) |
||
| + | |[[Tigrex]] |
||
| + | |30% |
||
| + | |101 |
||
| + | |- |
||
| + | |[[Brute Tigrex]] |
||
| + | |20% |
||
| + | |101 |
||
| + | |- |
||
| + | |[[Yian Garuga]] |
||
| + | |20% |
||
| + | |101 |
||
| + | |- |
||
| + | |[[Kushala Daora]] |
||
| + | |15% |
||
| + | |101 |
||
| + | |- |
||
| + | |style="border-bottom: 2px solid #000000;"|[[Brachydios]] |
||
| + | |style="border-bottom: 2px solid #000000;"|15% |
||
| + | |style="border-bottom: 2px solid #000000;"|120 |
||
| + | |- |
||
| + | |rowspan="4" style="border-bottom: 2px solid #000000;"|[[Tetsucabra]] |
||
| + | |[[Brute Tigrex]] |
||
| + | |40% |
||
| + | |90 |
||
| + | |- |
||
| + | |[[Ruby Basarios]] |
||
| + | |25% |
||
| + | |90 |
||
| + | |- |
||
| + | |[[Plum Daimyo Hermitaur]] |
||
| + | |20% |
||
| + | |86 |
||
| + | |- |
||
| + | |style="border-bottom: 2px solid #000000;"|[[Deviljho]] |
||
| + | |style="border-bottom: 2px solid #000000;"|15% |
||
| + | |style="border-bottom: 2px solid #000000;"|116 |
||
| + | |- |
||
| + | |rowspan="4" style="border-bottom: 2px solid #000000;"|[[Berserk Tetsucabra]] |
||
| + | |[[Brute Tigrex]] |
||
| + | |40% |
||
| + | |90 |
||
| + | |- |
||
| + | |[[Ruby Basarios]] |
||
| + | |25% |
||
| + | |90 |
||
| + | |- |
||
| + | |[[Plum Daimyo Hermitaur]] |
||
| + | |20% |
||
| + | |86 |
||
| + | |- |
||
| + | |style="border-bottom: 2px solid #000000;"|[[Oroshi Kirin]] |
||
| + | |style="border-bottom: 2px solid #000000;"|15% |
||
| + | |style="border-bottom: 2px solid #000000;"|116 |
||
| + | |- |
||
| + | |rowspan="3" style="border-bottom: 2px solid #000000;"|[[Velocidrome]] |
||
| + | |[[Velocidrome]] |
||
| + | |60% |
||
| + | |86 |
||
| + | |- |
||
| + | |[[Yian Kut-Ku]] |
||
| + | |25% |
||
| + | |86 |
||
| + | |- |
||
| + | |style="border-bottom: 2px solid #000000;"|[[Chameleos]] |
||
| + | |style="border-bottom: 2px solid #000000;"|15% |
||
| + | |style="border-bottom: 2px solid #000000;"|116 |
||
| + | |- |
||
| + | |rowspan="4" style="border-bottom: 2px solid #000000;"|[[Nerscylla]]<br />(Unstable Only) |
||
| + | |[[Ruby Basarios]] |
||
| + | |40% |
||
| + | |86 |
||
| + | |- |
||
| + | |[[Zinogre]] |
||
| + | |30% |
||
| + | |86 |
||
| + | |- |
||
| + | |[[Plum Daimyo Hermitaur]] |
||
| + | |15% |
||
| + | |86 |
||
| + | |- |
||
| + | |style="border-bottom: 2px solid #000000;"|[[Deviljho]] |
||
| + | |style="border-bottom: 2px solid #000000;"|15% |
||
| + | |style="border-bottom: 2px solid #000000;"|116 |
||
| + | |- |
||
| + | |rowspan="4" style="border-bottom: 2px solid #000000;"|[[Shrouded Nerscylla]]<br />(Rare Only) |
||
| + | |[[Seregios]] |
||
| + | |40% |
||
| + | |94 |
||
| + | |- |
||
| + | |[[Stygian Zinogre]] |
||
| + | |30% |
||
| + | |94 |
||
| + | |- |
||
| + | |[[Oroshi Kirin]] |
||
| + | |15% |
||
| + | |118 |
||
| + | |- |
||
| + | |style="border-bottom: 2px solid #000000;"|[[Plum Daimyo Hermitaur]] |
||
| + | |style="border-bottom: 2px solid #000000;"|15% |
||
| + | |style="border-bottom: 2px solid #000000;"|94 |
||
| + | |- |
||
| + | |rowspan="4" style="border-bottom: 2px solid #000000;"|[[Basarios]] |
||
| + | |[[Basarios]] |
||
| + | |50% |
||
| + | |94 |
||
| + | |- |
||
| + | |[[Ruby Basarios]] |
||
| + | |20% |
||
| + | |94 |
||
| + | |- |
||
| + | |[[Kirin]] |
||
| + | |15% |
||
| + | |116 |
||
| + | |- |
||
| + | |style="border-bottom: 2px solid #000000;"|[[Tigrex]] |
||
| + | |style="border-bottom: 2px solid #000000;"|15% |
||
| + | |style="border-bottom: 2px solid #000000;"|94 |
||
| + | |- |
||
| + | |rowspan="4" style="border-bottom: 2px solid #000000;"|[[Ruby Basarios]]<br />(Rare Only) |
||
| + | |[[Ruby Basarios]] |
||
| + | |50% |
||
| + | |98 |
||
| + | |- |
||
| + | |[[Brute Tigrex]] |
||
| + | |20% |
||
| + | |94 |
||
| + | |- |
||
| + | |[[Basarios]] |
||
| + | |15% |
||
| + | |98 |
||
| + | |- |
||
| + | |style="border-bottom: 2px solid #000000;"|[[Oroshi Kirin]] |
||
| + | |style="border-bottom: 2px solid #000000;"|15% |
||
| + | |style="border-bottom: 2px solid #000000;"|116 |
||
| + | |- |
||
| + | |rowspan="3" style="border-bottom: 2px solid #000000;"|[[Congalala]]<br />(Unstable Only) |
||
| + | |[[Yian Kut-Ku]] |
||
| + | |50% |
||
| + | |90 |
||
| + | |- |
||
| + | |[[Ruby Basarios]] |
||
| + | |30% |
||
| + | |86 |
||
| + | |- |
||
| + | |style="border-bottom: 2px solid #000000;"|[[Kirin]] |
||
| + | |style="border-bottom: 2px solid #000000;"|20% |
||
| + | |style="border-bottom: 2px solid #000000;"|116 |
||
| + | |- |
||
| + | |rowspan="4" style="border-bottom: 2px solid #000000;"|[[Emerald Congalala]]<br />(Unstable Only) |
||
| + | |[[Diablos]] |
||
| + | |30% |
||
| + | |94 |
||
| + | |- |
||
| + | |[[Ruby Basarios]] |
||
| + | |30% |
||
| + | |94 |
||
| + | |- |
||
| + | |[[Zinogre]] |
||
| + | |20% |
||
| + | |94 |
||
| + | |- |
||
| + | |style="border-bottom: 2px solid #000000;"|[[Kirin]] |
||
| + | |style="border-bottom: 2px solid #000000;"|20% |
||
| + | |style="border-bottom: 2px solid #000000;"|116 |
||
| + | |- |
||
| + | |rowspan="4" style="border-bottom: 2px solid #000000;"|[[Khezu]] |
||
| + | |[[Stygian Zinogre]] |
||
| + | |40% |
||
| + | |94 |
||
| + | |- |
||
| + | |[[Gore Magala]] |
||
| + | |25% |
||
| + | |90 |
||
| + | |- |
||
| + | |[[Diablos]] |
||
| + | |20% |
||
| + | |98 |
||
| + | |- |
||
| + | |style="border-bottom: 2px solid #000000;"|[[Kushala Daora]] |
||
| + | |style="border-bottom: 2px solid #000000;"|15% |
||
| + | |style="border-bottom: 2px solid #000000;"|116 |
||
| + | |- |
||
| + | |rowspan="4" style="border-bottom: 2px solid #000000;"|[[Red Khezu]] |
||
| + | |[[Zinogre]] |
||
| + | |30% |
||
| + | |94 |
||
| + | |- |
||
| + | |[[Black Diablos]] |
||
| + | |30% |
||
| + | |94 |
||
| + | |- |
||
| + | |[[Brachydios]] |
||
| + | |20% |
||
| + | |94 |
||
| + | |- |
||
| + | |style="border-bottom: 2px solid #000000;"|[[Kirin]] |
||
| + | |style="border-bottom: 2px solid #000000;"|20% |
||
| + | |style="border-bottom: 2px solid #000000;"|116 |
||
| + | |- |
||
| + | |rowspan="4" style="border-bottom: 2px solid #000000;"|[[Monoblos]] |
||
| + | |[[Yian Garuga]] |
||
| + | |35% |
||
| + | |101 |
||
| + | |- |
||
| + | |[[Gore Magala]] |
||
| + | |25% |
||
| + | |98 |
||
| + | |- |
||
| + | |[[Deviljho]] |
||
| + | |20% |
||
| + | |118 |
||
| + | |- |
||
| + | |style="border-bottom: 2px solid #000000;"|[[Teostra]] |
||
| + | |style="border-bottom: 2px solid #000000;"|20% |
||
| + | |style="border-bottom: 2px solid #000000;"|116 |
||
| + | |- |
||
| + | |rowspan="4" style="border-bottom: 2px solid #000000;"|[[White Monoblos]]<br />(Rare Only) |
||
| + | |[[Black Diablos]] |
||
| + | |40% |
||
| + | |101 |
||
| + | |- |
||
| + | |[[Deviljho]] |
||
| + | |30% |
||
| + | |118 |
||
| + | |- |
||
| + | |[[Teostra]] |
||
| + | |20% |
||
| + | |118 |
||
| + | |- |
||
| + | |style="border-bottom: 2px solid #000000;"|[[Rajang]] |
||
| + | |style="border-bottom: 2px solid #000000;"|10% |
||
| + | |style="border-bottom: 2px solid #000000;"|118 |
||
| + | |- |
||
| + | |rowspan="4" style="border-bottom: 2px solid #000000;"|[[Rathian]]<br />(Unstable Only) |
||
| + | |[[Zinogre]] |
||
| + | |30% |
||
| + | |98 |
||
| + | |- |
||
| + | |[[Kushala Daora]] |
||
| + | |30% |
||
| + | |116 |
||
| + | |- |
||
| + | |[[Black Diablos]] |
||
| + | |25% |
||
| + | |94 |
||
| + | |- |
||
| + | |style="border-bottom: 2px solid #000000;"|[[Seregios]] |
||
| + | |style="border-bottom: 2px solid #000000;"|15% |
||
| + | |style="border-bottom: 2px solid #000000;"|94 |
||
| + | |- |
||
| + | |rowspan="4" style="border-bottom: 2px solid #000000;"|[[Pink Rathian]] |
||
| + | |[[Seregios]] |
||
| + | |35% |
||
| + | |94 |
||
| + | |- |
||
| + | |[[Stygian Zinogre]] |
||
| + | |25% |
||
| + | |94 |
||
| + | |- |
||
| + | |[[Diablos]] |
||
| + | |25% |
||
| + | |98 |
||
| + | |- |
||
| + | |style="border-bottom: 2px solid #000000;"|[[Kirin]] |
||
| + | |style="border-bottom: 2px solid #000000;"|15% |
||
| + | |style="border-bottom: 2px solid #000000;"|116 |
||
| + | |- |
||
| + | |rowspan="4" style="border-bottom: 2px solid #000000;"|[[Rathalos]]<br />(Unstable Only) |
||
| + | |[[Gore Magala]] |
||
| + | |35% |
||
| + | |98 |
||
| + | |- |
||
| + | |[[Yian Garuga]] |
||
| + | |25% |
||
| + | |101 |
||
| + | |- |
||
| + | |[[Oroshi Kirin]] |
||
| + | |20% |
||
| + | |118 |
||
| + | |- |
||
| + | |style="border-bottom: 2px solid #000000;"|[[Teostra]] |
||
| + | |style="border-bottom: 2px solid #000000;"|15% |
||
| + | |style="border-bottom: 2px solid #000000;"|118 |
||
| + | |- |
||
| + | |rowspan="4" style="border-bottom: 2px solid #000000;"|[[Azure Rathalos]] |
||
| + | |[[Shagaru Magala]] |
||
| + | |35% |
||
| + | |118 |
||
| + | |- |
||
| + | |[[Yian Garuga]] |
||
| + | |25% |
||
| + | |101 |
||
| + | |- |
||
| + | |[[Rajang]] |
||
| + | |20% |
||
| + | |118 |
||
| + | |- |
||
| + | |style="border-bottom: 2px solid #000000;"|[[Kushala Daora]] |
||
| + | |style="border-bottom: 2px solid #000000;"|15% |
||
| + | |style="border-bottom: 2px solid #000000;"|118 |
||
| + | |- |
||
| + | |} |
||
| + | <nowiki>*</nowiki>''Numbers listed are rough estimates.'' |
||
Version du 23 février 2015 à 22:22
|
Modèle:MH4UMenuV2
Expeditions
In this single player mode, hunters explore the Everwood without prior knowledge of the map layout or the kinds of monsters that will appear.
- There are no fail conditions. You will return to base camp no matter how many times you faint.
- If you reach the wagon waiting at the end of the Everwood, you'll receive special benefits and perks. You can also end an Expedition from the menu at any time.
- Hunting monsters you discover during an Expedition will net you Caravan Points, which can be used at certain facilities.
Going On an Expedition
After you gain access to the Everwood, you can go on an Expedition at any time from the World Map.
By completing Quests undertaken at towns and at the Gathering Hall, you'll unlock the ability to go on High-rank and G-rank Expeditions.
Relics
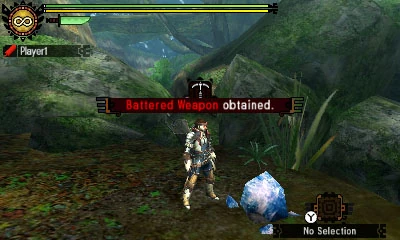
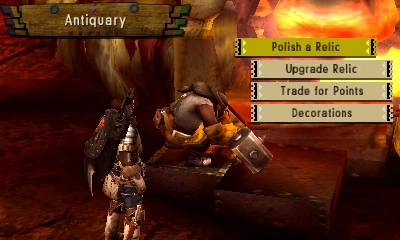
You may discover weapons and armor in the Everwood known as "Relics", but you won't be able to use them as they are. You'll have to take them to a certain town to polish them up before they can be used.
- For a list of Relic Weapons, see the MH4U: Relic Weapons page.
- For a list of Relic Armors, see the MH4U: Relic Armor page.
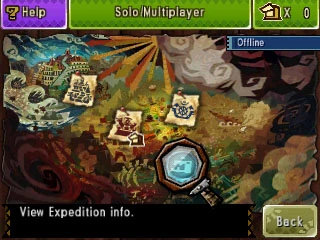
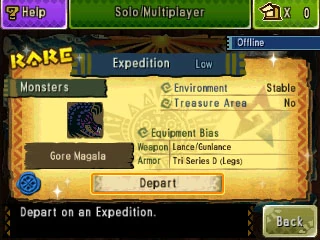
Viewing Expedition Info


Expedition info is available for viewing from the World Map before you depart on an Expedition. Check back often as the monsters and Relics that appear in the Everwood change each time you return from a Quest.
- Monsters
- Monsters known to appear in the area.
- Environment
- If the environment is listed as "Unstable", there is a possibility of monsters not listed in the Expedition info appearing.
- Treasure Area
- Indicates whether or not there are areas where rare items can be acquired.
- Wild Palicoes
- Indicates whether or not there are Wild Palicoes waiting to be recruited. (Wild Palicoes will begin to appear once you've made a certain level of progress through the single player mode.)
- Poogie
- Indicates whether or not there are poogies out for a stroll. Poogies found in the Everwood may be wearing unusual costumes.
- Equipment Bias
- Indicates the type of equipment likely to be obtained from Relics.
Rare Ecospheres

Occasionally, Rare Ecospheres appear where special monsters can be hunted and valuable items are easily found. The chances of Rare Ecospheres appearing will increase as you go on Expeditions and increase your Rare Eco Discovery Rate.
Monster Unlocks
| Monster Unlocked | Quest Required | Expedition Rank |
| Kecha Wacha | Complete 3★ Caravan Quest "Swing Into Action" | Low Rank |
| Tetsucabra | Complete 3★ Caravan Quest "Boulder-bash" | Low Rank |
| Gypceros | Complete 3★ Caravan Quest "Shipshape Skin" | Low Rank |
| Basarios | Complete 3★ Caravan Quest "Research: Basarios" | Low Rank |
| Nerscylla | Complete 4★ Caravan Quest "Nerscylla Thrilla" | Low Rank |
| Congalala | Complete 4★ Caravan Quest "Wild Palico Panic" | Low Rank |
| Najarala | Complete 4★ Caravan Quest "Najarala Hunt" | Low Rank |
| Khezu | Complete 4★ Caravan Quest "The Walls Have Eyes" | Low Rank |
| Rathian | Complete 4★ Caravan Quest "Troverian Trouble" | Low Rank |
| Gore Magala | Complete 5★ Caravan Quest "Tipping the Scales" | Low Rank |
| Iodrome | Complete 5★ Caravan Quest "Pick Your Poison" | Low Rank |
| Gravios | Complete 5★ Caravan Quest "Major Miner Problem" | Low Rank |
| Seltas Queen | Complete 5★ Caravan Quest "The Royal Guard" | Low Rank |
| Rathalos | Complete 5★ Caravan Quest "King of the Skies" | Low Rank |
| Yian Garuga | Complete 5★ Caravan Quest "Research: Yian Garuga" | Low Rank |
| Seltas | Complete 4★ Gathering Hall Quest "Seltas Romance" | High Rank |
| Kecha Wacha | Complete 4★ Gathering Hall Quest "Operation Catch-a-Kecha" | High Rank |
| Gypceros | Complete 4★ Gathering Hall Quest "Gypceros Overload" | High Rank |
| Emerald Congalala | Complete 4★ Gathering Hall Quest "Buffoonish Baboon" | High Rank |
| Congalala | Complete 4★ Gathering Hall Quest "Pink Stink" | High Rank |
| Nerscylla | Complete 5★ Gathering Hall Quest "Rathian's Wrath" | High Rank |
| Blue Yian Kut-Ku | Complete 5★ Gathering Hall Quest "Rathian's Wrath" | High Rank |
| Tetsucabra | Complete 5★ Gathering Hall Quest "Rathian's Wrath" | High Rank |
| Purple Gypceros | Complete 5★ Gathering Hall Quest "Rathian's Wrath" | High Rank |
| Yian Kut-Ku | Complete 5★ Gathering Hall Quest "Rathian's Wrath" | High Rank |
| Khezu | Complete 5★ Gathering Hall Quest "Electrifying Encounter" | High Rank |
| Rathalos | Complete 5★ Gathering Hall Quest "Advanced: Eerie Aerie" | High Rank |
| Ruby Basarios | Complete 6★ Gathering Hall Quest "Ore D'oeuvre" | High Rank |
| Najarala | Complete 6★ Gathering Hall Quest "Ore D'oeuvre" | High Rank |
| Pink Rathian | Complete 6★ Gathering Hall Quest "Ore D'oeuvre" | High Rank |
| Red Khezu | Complete 6★ Gathering Hall Quest "Ore D'oeuvre" | High Rank |
| Basarios | Complete 6★ Gathering Hall Quest "Ore D'oeuvre" | High Rank |
| Rathian | Complete 6★ Gathering Hall Quest "Advanced: Heaven and Earth" | High Rank |
| Tigrex | Complete 6★ Gathering Hall Quest "Advanced: Forest Gone Wild" | High Rank |
| Gravios | Complete 7★ Gathering Hall Quest "Advanced: Stop the Wheel" | High Rank |
| Gore Magala | Complete 7★ Gathering Hall Quest "Advanced: Stop the Wheel" | High Rank |
| Yian Garuga | Complete 7★ Gathering Hall Quest "Advanced: Stop the Wheel" | High Rank |
| Seltas Queen | Complete 7★ Gathering Hall Quest "Advanced: Stop the Wheel" | High Rank |
| Black Gravios | Complete 7★ Gathering Hall Quest "Advanced: Stop the Wheel" | High Rank |
| Azure Rathalos | Complete 7★ Gathering Hall Quest "Ring of the Silver Sol" | High Rank |
| Khezu | Complete 10★ Caravan Quest "Icy Shadow" | G Rank |
| Shrouded Nerscylla | Complete 10★ Caravan Quest "Shrouded in Mystery" | G Rank |
| Monoblos | Complete 10★ Caravan Quest "Bad Hair Day: Monoblos" | G Rank |
| White Monoblos | Complete 10★ Caravan Quest "The Silvery Spear" | G Rank |
| Kecha Wacha | Complete G1★ Gathering Hall Quest "Lumber Support" | G Rank |
| Tetsucabra | Complete G1★ Gathering Hall Quest "Chasing Tail" | G Rank |
| Purple Gypceros | Complete G1★ Gathering Hall Quest "Purple Pros" | G Rank |
| Congalala | Complete G1★ Gathering Hall Quest "Hunger Games" | G Rank |
| Emerald Congalala | Complete G1★ Gathering Hall Quest "Primate Plunder" | G Rank |
| Nerscylla | Complete G1★ Gathering Hall Quest "Death and Taxidermy" | G Rank |
| Najarala | Complete G1★ Gathering Hall Quest "Serpentine Samba" | G Rank |
| Pink Rathian | Complete G1★ Gathering Hall Quest "Pink Problems" | G Rank |
| Red Khezu | Complete G1★ Gathering Hall Quest "La Vie en Rose" | G Rank |
| Khezu | Complete G1★ Gathering Hall Quest "Hunt-a-thon: Khezu" | G Rank |
| Shrouded Nerscylla | Complete G2★ Gathering Hall Quest "Course Correction" | G Rank |
| Rathalos | Complete G2★ Gathering Hall Quest "Sovereign of the Sky" | G Rank |
| Azure Rathalos | Complete G2★ Gathering Hall Quest "The Azure King and the Tyrant" | G Rank |
| Tigrex | Complete G2★ Gathering Hall Quest "The Azure King and the Tyrant" | G Rank |
| Seltas Queen | Complete G2★ Gathering Hall Quest "Strutting the Royal Runway" | G Rank |
| Desert Seltas Queen | Complete G2★ Gathering Hall Quest "Pestering Pest" | G Rank |
| Gravios | Complete G2★ Gathering Hall Quest "Temper Tantrum" | G Rank |
| Black Gravios | Complete G2★ Gathering Hall Quest "Hollow Promise" | G Rank |
| Diablos | Complete G2★ Gathering Hall Quest "Showdown at High Noon" | G Rank |
| Black Diablos | Complete G2★ Gathering Hall Quest "Showdown at Midnight" | G Rank |
G Rank Guild Quests Gained
| Monster Hunted | Monster Received | Probability* | Initial Level* |
| Seltas | Velocidrome | 50% | 86 |
| Yian Kut-Ku | 30% | 86 | |
| Rajang | 20% | 116 | |
| Desert Seltas | Velocidrome | 50% | 86 |
| Yian Kut-Ku | 30% | 86 | |
| Chameleos | 20% | 116 | |
| Deviljho (Unstable Only) |
Deviljho | 30% | 120 |
| Ruby Basarios | 30% | 94 | |
| Kirin | 20% | 120 | |
| Oroshi Kirin | 20% | 120 | |
| Savage Deviljho (Rare Only) |
Deviljho | 40% | 120 |
| Yian Garuga | 20% | 94 | |
| Oroshi Kirin | 20% | 120 | |
| Rajang | 20% | 120 | |
| Yian Garuga (Rare Only) |
Yian Garuga | 40% | 94 |
| Seregios | 20% | 94 | |
| Black Diablos | 20% | 94 | |
| Oroshi Kirin | 20% | 118 | |
| Yian Kut-Ku | Yian Kut-Ku | 40% | 90 |
| Basarios | 30% | 86 | |
| Blue Yian Kut-Ku | 20% | 90 | |
| Rajang | 10% | 116 | |
| Blue Yian Kut-Ku (Rare Only) |
Blue Yian Kut-Ku | 50% | 90 |
| Yian Kut-Ku | 20% | 90 | |
| Plum Daimyo Hermitaur | 20% | 90 | |
| Chameleos | 10% | 116 | |
| Najarala | Yian Garuga | 30% | 94 |
| Gore Magala | 20% | 94 | |
| Tigrex | 20% | 94 | |
| Kirin | 15% | 116 | |
| Brachydios | 15% | 94 | |
| Tidal Najarala (Rare Only) |
Yian Garuga | 30% | 98 |
| Stygian Zinogre | 30% | 94 | |
| Brute Tigrex | 25% | 94 | |
| Oroshi Kirin | 25% | 116 | |
| Brachydios | 25% | 90 | |
| Gravios | Yian Garuga | 40% | 98 |
| Gore Magala | 30% | 94 | |
| Teostra | 15% | 94 | |
| Rajang | 15% | 116 | |
| Gravios | Yian Garuga | 40% | 98 |
| Gore Magala | 30% | 94 | |
| Teostra | 15% | 94 | |
| Rajang | 15% | 116 | |
| Black Gravios | Black Diablos | 40% | 101 |
| Shagaru Magala | 30% | 120 | |
| Kushala Daora | 15% | 120 | |
| Rajang | 15% | 120 | |
| Kecha Wacha | Velocidrome | 40% | 90 |
| Yian Kut-Ku | 30% | 90 | |
| Rajang | 20% | 116 | |
| Basarios | 10% | 86 | |
| Ash Kecha Wacha (Rare Only) |
Ruby Basarios | 50% | 86 |
| Blue Yian Kut-Ku | 35% | 86 | |
| Chameleos | 15% | 120 | |
| Seltas Queen | Brachydios | 35% | 101 |
| Gore Magala | 25% | 98 | |
| Shagaru Magala | 25% | 116 | |
| Kushala Daora | 15% | 118 | |
| Desert Seltas Queen | Brachydios | 35% | 101 |
| Gore Magala | 25% | 98 | |
| Shagaru Magala | 25% | 120 | |
| Teostra | 15% | 120 | |
| Gypceros (Unstable Only) |
Blue Yian Kut-Ku | 50% | 86 |
| Velocidrome | 35% | 86 | |
| Kirin | 15% | 116 | |
| Purple Gypceros (Unstable Only) |
Blue Yian Kut-Ku | 40% | 86 |
| Velocidrome | 35% | 86 | |
| Kirin | 25% | 116 | |
| Gore Magala (Rare Only) |
Gore Magala | 40% | 98 |
| Shagaru Magala | 30% | 116 | |
| Teostra | 30% | 118 | |
| Seregios (Rare Only) |
Seregios | 40% | 94 |
| Yian Garuga | 25% | 98 | |
| Gore Magala | 20% | 98 | |
| Oroshi Kirin | 15% | 118 | |
| Daimyo Hermitaur | Plum Daimyo Hermitaur | 40% | 86 |
| Yian Kut-Ku | 20% | 90 | |
| Basarios | 20% | 86 | |
| Rajang | 20% | 116 | |
| Plum Daimyo Hermitaur (Unstable Only) |
Plum Daimyo Hermitaur | 40% | 86 |
| Blue Yian Kut-Ku | 20% | 90 | |
| Chameleos | 20% | 120 | |
| Basarios | 20% | 90 | |
| Diablos | Diablos | 40% | 101 |
| Black Diablos | 25% | 101 | |
| Kirin | 20% | 118 | |
| Kushala Daora | 15% | 120 | |
| Black Diablos | Black Diablos | 40% | 101 |
| Yian Garuga | 20% | 101 | |
| Diablos | 20% | 101 | |
| Teostra | 20% | 120 | |
| Tigrex (Unstable Only) |
Tigrex | 30% | 101 |
| Brute Tigrex | 20% | 101 | |
| Yian Garuga | 20% | 101 | |
| Kushala Daora | 15% | 101 | |
| Brachydios | 15% | 120 | |
| Tetsucabra | Brute Tigrex | 40% | 90 |
| Ruby Basarios | 25% | 90 | |
| Plum Daimyo Hermitaur | 20% | 86 | |
| Deviljho | 15% | 116 | |
| Berserk Tetsucabra | Brute Tigrex | 40% | 90 |
| Ruby Basarios | 25% | 90 | |
| Plum Daimyo Hermitaur | 20% | 86 | |
| Oroshi Kirin | 15% | 116 | |
| Velocidrome | Velocidrome | 60% | 86 |
| Yian Kut-Ku | 25% | 86 | |
| Chameleos | 15% | 116 | |
| Nerscylla (Unstable Only) |
Ruby Basarios | 40% | 86 |
| Zinogre | 30% | 86 | |
| Plum Daimyo Hermitaur | 15% | 86 | |
| Deviljho | 15% | 116 | |
| Shrouded Nerscylla (Rare Only) |
Seregios | 40% | 94 |
| Stygian Zinogre | 30% | 94 | |
| Oroshi Kirin | 15% | 118 | |
| Plum Daimyo Hermitaur | 15% | 94 | |
| Basarios | Basarios | 50% | 94 |
| Ruby Basarios | 20% | 94 | |
| Kirin | 15% | 116 | |
| Tigrex | 15% | 94 | |
| Ruby Basarios (Rare Only) |
Ruby Basarios | 50% | 98 |
| Brute Tigrex | 20% | 94 | |
| Basarios | 15% | 98 | |
| Oroshi Kirin | 15% | 116 | |
| Congalala (Unstable Only) |
Yian Kut-Ku | 50% | 90 |
| Ruby Basarios | 30% | 86 | |
| Kirin | 20% | 116 | |
| Emerald Congalala (Unstable Only) |
Diablos | 30% | 94 |
| Ruby Basarios | 30% | 94 | |
| Zinogre | 20% | 94 | |
| Kirin | 20% | 116 | |
| Khezu | Stygian Zinogre | 40% | 94 |
| Gore Magala | 25% | 90 | |
| Diablos | 20% | 98 | |
| Kushala Daora | 15% | 116 | |
| Red Khezu | Zinogre | 30% | 94 |
| Black Diablos | 30% | 94 | |
| Brachydios | 20% | 94 | |
| Kirin | 20% | 116 | |
| Red Khezu | Zinogre | 30% | 94 |
| Black Diablos | 30% | 94 | |
| Brachydios | 20% | 94 | |
| Kirin | 20% | 116 | |
| Monoblos | Yian Garuga | 35% | 101 |
| Gore Magala | 25% | 98 | |
| Deviljho | 20% | 118 | |
| Teostra | 20% | 116 | |
| White Monoblos (Rare Only) |
Black Diablos | 40% | 101 |
| Deviljho | 30% | 118 | |
| Teostra | 20% | 118 | |
| Rajang | 10% | 118 | |
| Rathian (Unstable Only) |
Zinogre | 30% | 98 |
| Kushala Daora | 30% | 116 | |
| Black Diablos | 25% | 94 | |
| Seregios | 15% | 94 | |
| Pink Rathian | Seregios | 35% | 94 |
| Stygian Zinogre | 25% | 94 | |
| Diablos | 25% | 98 | |
| Kirin | 15% | 116 | |
| Rathalos (Unstable Only) |
Gore Magala | 35% | 98 |
| Yian Garuga | 25% | 101 | |
| Oroshi Kirin | 20% | 118 | |
| Teostra | 15% | 118 | |
| Azure Rathalos | Shagaru Magala | 35% | 118 |
| Yian Garuga | 25% | 101 | |
| Rajang | 20% | 118 | |
| Kushala Daora | 15% | 118 |
*Numbers listed are rough estimates.